
When it comes to getting crafty with your kids, one of the things to find are crafts that children of different ages can make together.
The great thing about these popsicle stick Easter crafts is that kids of all ages can have fun making them!
Quick Popsicle Stick Easter Puzzle Game

Image Source/Tutorial: Crafty Morning
I think this craft is so smart! It’s a fun game that’s also secretly educational, helping children improve their focus while they play.
First, you’ll lay out ten popsicle sticks side by side and write numbers on them. A piece of tape across them will hold them all together. On the other side, draw an egg shape.
You can do the same thing with another set of popsicle sticks but draw a bunny instead. After you paint the egg and bunny, just remove the tape. Mix up all the sticks and you have a puzzle ready to solve!
Adorable Bunny Popsicle Stick Craft for Kids

Image Source/Tutorial: Simple Everyday Mom
This one is just so adorable! You start by cutting a single popsicle stick into three sections.
Paste four whole sticks together side by side, then attach the three cut sections on the back. Paint them all white.
Take a bunny head cutout and draw the inner ears and a nose using a pink marker, then attach it to the popsicle sticks.
Now, arrange the bunny’s legs at the bottom of the sticks. The belly cutout goes right in the middle, and the arm cutouts get pasted on top of the belly. Finish it off with a bowtie and a pom-pom!
Easy Popsicle Stick Bunny Puppet for Easter

Image Source/Tutorial: Crafty Morning
This Easter bunny puppet is perfect for pre-schoolers since they need very little assistance to make it. Just paste two popsicle sticks together side by side and paint them white.
From white cardstock, cut out ears, cheeks, and feet. Then, from pink cardstock, cut out inner ears, a nose, and the inside of the feet.
Paste all these shapes onto the popsicle stick to form your bunny. The final step is adding googly eyes to complete the craft.
Popsicle Sticks Easter Basket Craft for Kids

Image Source/Tutorial: The Joy Sharing
Let’s make a super cute Easter basket! First, glue a circle made of cardstock paper to the bottom of a cardboard tube to create the base.
Next, take seven colored popsicle sticks, cut them in half, and paste them all around the cardboard tube. A pipe cleaner pasted to the top makes a perfect handle.
Now for the fun part! You can decorate the basket with colored tape, gems, markers, or any other materials you like.
Hatching Chick Popsicle Stick Craft

Image Source/Tutorial: Today’s Creative Ideas
This hatching chick is one of my favorites! Start by drawing an egg shape on white construction paper. Cut the egg from the middle with a jagged line to look like a broken eggshell.
Then, paste some popsicle sticks onto cardstock and paint them yellow. Glue the two eggshell pieces on both sides of the popsicle sticks. From a piece of orange craft paper, draw and cut out a beak.
Add a pair of googly eyes, and your hatching chick is all done!
Easy Easter Bunny Craft for Kids With Popsicle Sticks
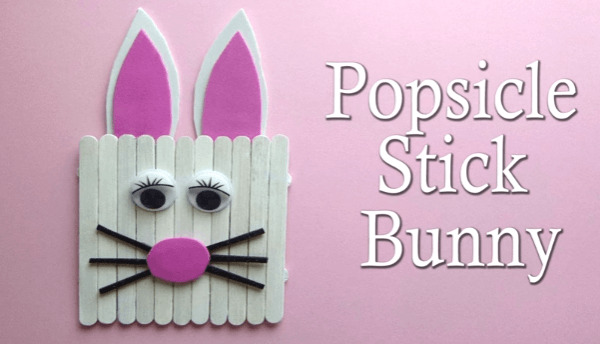
Image Source/Tutorial: Easy Kids Craft
Here’s a simple popsicle stick bunny that is great for a lower primary kid. The steps are super easy. Glue eleven popsicle sticks together to make a rectangle.
For support, add another two popsicle sticks onto the back. On different colors of craft foam, draw the outer ears, nose, eyes, inner ears, and pupil, and then cut them out.
Assemble all the foam elements on the rectangle to bring your bunny to life. Don’t forget to add some pipe cleaners near the nose to make the whiskers.
Bunny and Chick Easter Set Craft for Kids

Image Source/Tutorial: Turbo Fun Crafts
To make this cute set, you’ll paste yellow popsicle sticks sideways for the chick and blue sticks for the bunny. For the bunny’s head, add another popsicle stick across the front and paint the upper and lower portions.
Cut out shapes for ears, feet, beaks, wings, and hair from craft paper. Assemble all the cutouts to create your characters. Add googly eyes and then draw on more details with markers.
The bunny gets some pipe cleaner whiskers to finish the look!
Stunning Easter Bunny Craft from Popsicle Sticks

Image Source/Tutorial: Craft Create Cook
This bunny craft is truly stunning. You will glue three popsicle sticks together to make a triangle. Paste pink felt onto the triangle and attach googly eyes in the center with the triangle pointing down.
Now, cut some pipe cleaners and glue them to the bottom of the triangle in a criss-cross pattern to make whiskers. A pink button goes in the middle of the pipe cleaners.
To make the ears, twist pipe cleaners into loops and paste them to the back of the bunny.
Little Bunny Popsicle Stick Easter Craft for Kids

Image Source/Tutorial: Paper Crafts-TR
You can make an adorable popsicle stick bunny of your own with this craft! Paste five popsicle sticks together side by side to form a rectangle. For support, add two half popsicle sticks to the back.
On different colored craft papers, draw the outer ears, eyes, a nose, and inner ears, then cut them all out. Assemble all the pieces to shape your bunny.
As a final touch, attach some pipe cleaners for whiskers to complete the look.
Easy Popsicle Stick Bunny Photo Frame Craft

Image Source/Tutorial: Easy Kids Craft
I love crafts that are also keepsakes! First, paste popsicle sticks together to make a fence shape. On top of the fence, attach two sticks on each end. Then, paste this entire frame between five more popsicle sticks.
From white foam, cut out ears and feet and assemble them on the edge. You can draw the inner ear and feet details on pink foam and assemble those cutouts on top of the white pieces. Lastly, paste a picture inside the frame to complete it.
Popsicle Stick Easter Bunny Set for Kids

Kids from the lower primary age group can totally do this craft with just a little help. Glue some popsicle sticks together to form a rectangle and then paste another popsicle stick across the front.
Paint the bottom portion a light color and the upper portion a dark color. Then, from different colored craft papers, cut out ears, inner ears, a nose, eyes, and whiskers.
Assemble all the parts to shape your bunny.
Creative Bunny Popsicle Stick Easter Craft

Image Source/Tutorial: Marina Makes Blog
On a piece of construction paper, cut a slit near the bottom. The kids can use their thumbs to paint some Easter eggs on it. Then, draw and cut out a bunny shape from felt.
Add pom-poms for the nose, eye, and tail. Glue this felt bunny onto a popsicle stick. Cut long pieces from green sheets of paper and paste them along the bottom of the paper to look like grass.
You can even decorate the art with a sun, butterflies, and clouds.
Popsicle Stick Easter Bunny Craft for Kids

Image Source/Tutorial: Today’s Creative Ideas
This craft is just right for kids in the primary grades, though they might need a little help to finish it. Start by gluing popsicle sticks together to create a rectangle.
Paste another popsicle stick across the front. Paint the bottom part white and the top part yellow. Cut out the ears and a nose from construction paper.
Now, attach googly eyes, the ears, and the nose. Use a marker to draw any extra details to finish your Easter bunny.
Attractive Popsicle Stick Easter Craft

Image Source/Tutorial: Glued To My Crafts Blog
First, glue your popsicle sticks together to look like a little fence. Paint the popsicle fence white and yellow to make a bunny and a chick.
From cardstock paper, cut out a beak and feet for the chick, and ears and a nose for the bunny. You can even trace your kid’s hand to make the chicken wings!
Now, assemble all the pieces to shape your characters. Draw any other details with a marker to complete this awesome Easter craft.
Easy Popsicle Stick Easter Bunny and Chick

Image Source/Tutorial: Scraps-of-reflections
This is such an easy popsicle stick craft for Easter and is a great choice for preschool-aged kids. Color some popsicle sticks purple and yellow to make your chick and bunny.
Paste the colored popsicle sticks together side by side. On colored craft paper, draw the elements for the bunny and chick and cut them out. Assemble the legs, arms, hair, and mouth for the characters.
Finally, add some googly eyes to complete their faces.
Bunny Popsicle Stick Craft for Kids

Image Source/Tutorial: Arty Crafty Kids
Line up four popsicle sticks next to each other and place another popsicle stick across them to hold them together, then paint them all white. Next, cut out a bunny’s face from craft paper.
Use colored markers to draw the eyes, nose, mouth, blush, and inner ears. Glue the bunny head to the top of the popsicle sticks. Cut out the bunny’s arms and paste them onto the back.
To finish, paste on some pom-poms for the belly and feet areas of the bunny.
Popsicle Stick Puffy Paint Bunny Craft

Image Source/Tutorial: Our Kid Things
We had so much fun with the puffy paint on this one! Paste six popsicle sticks together sideways and attach a white craft sheet to the back.
Add three more popsicle sticks to the head area to make ears. Paint the whole thing white. Now, attach a pink pom-pom right in the center to be the bunny’s nose.
Use puffy paint to create the whiskers and the lines inside the ears. Attach googly eyes and draw a mouth with a black marker to finish it up.
Attractive Easter Bunny Popsicle Stick Craft

Image Source/Tutorial: Feels Like Home Blog
For this project, you’ll want to measure out the bunny’s ears, eyes, bow, nose, support pieces, and face pieces based on the jar you are using.
Cut your popsicle sticks to match the measurements and sand the ends to make them smooth. Paint the bottom half of the eye pieces blue and the bow lavender.
Assemble the sticks to shape the face, then add the ears, eyes, bow, and nose. Cover the jar with popsicle sticks and paste the bunny head on top of the container.
Trendy Popsicle Stick Easter Bunny Craft

Image Source/Tutorial: My Mini Adventurer
Lower primary children can complete this trendy craft with ease, though they might need a little guidance. Take seven mini popsicle sticks and paste them together side by side.
Glue two more sticks on the back to make the bunny’s ears. On a piece of colored cardstock, draw the nose and inner ears for the bunny.
Arrange these parts to make the bunny’s face. Add googly eyes and draw on details with a black marker.