
Are you on the hunt for some adorable bird crafts for kids? I know I am. It’s a great way to talk about nature while getting crafty.
So here’s a long list of easy popsicle stick activities to try with your little ones while waiting for the next big holiday.
1. Penguin Craft With Popsicle Stick

Image Source/Tutorial: The Best Ideas For Kids
How darling is this little guy? To make this cute penguin, you’ll need to color seven large popsicle sticks and two small ones with black paint, and four more sticks with white paint.
Just arrange them like you see in the picture to create his body. For the feet, you just stick two pompoms on the ends of the white sticks! The nose is a kite-shaped piece of paper folded into two equal triangles.
So simple, and the final result is a sweet penguin that’s ready to display. It’s a wonderful way for kids to learn about this unique bird that doesn’t have wings but is still a bird!
2. Love Bird Craft Ideas For Valentine’s Day

Image Source/Tutorial: Gluedtomycraftsblog
I absolutely love this idea for Valentine’s Day or even an anniversary card! You start by making two triangles, each with three popsicle sticks.
Glue these triangles onto some colored paper to form the bodies. Then you can draw, cut, and stick on two circles in a corner of each triangle. Add some 3D eyes and a little paper nose.
The final touch, which I think is just the sweetest, is adding four kid’s printed hands to complete the love birds. It’s such a great craft for practicing shapes and color identification.
3. Easy to Make Baby Bluebird Craft

Image Source/Tutorial: Craftprojectideas
This little bluebird is so simple and fun. Just paint three popsicle sticks blue and glue them together as shown in the picture. Stick on two feathers for the wings and add some 3D eyes.
For the feet and nose, all you need is some orange origami paper, cut and pasted into place. Just like that, your bird is ready! I think a bunch of these would look amazing tied together with thread to make a wall hanging.
It’s also a really cool opportunity to share that there really is a bird called a Bluebird found in North America. What a fun way to learn about colors!
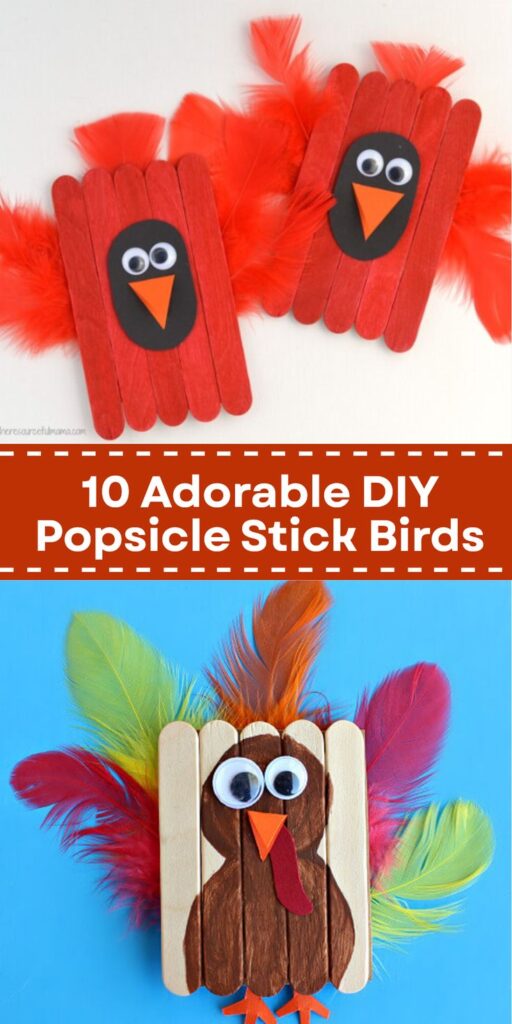
4. Mini Turkey Bird Craft With Popsicles

Image Source/Tutorial: Crafty Morning
This little turkey is a total hit! Take five popsicle sticks, arrange them as you see in the image, and glue them down. You can outline the bird shape with a pencil first and then fill it in with brown watercolor.
Pop on the 3D eyes and some feathers. The feet and nose can be cut from a foam sheet or origami paper.
I love how this project helps kids understand different body structures and shapes. It’s fantastic for building observation skills.
5. Flamingo Stick Art & Craft Idea For Kids

Image Source/Tutorial: Gluedtomycraftsblog
Ready for a pop of pink? For this flamingo, you’ll need two sets of six popsicle sticks. Arrange three sticks vertically and the other three horizontally to make an ‘L’ shape.
If you’re making a pair, remember to make one an inverted ‘L’ shape so they face each other! The beak can be made from black paper or even a black stick.
Paint all the popsicle sticks with pink color; you can use paint, crayons, or colored pencils. After you paste on the 3D eyes, use orange woolen thread or straws for the feet.
It’s such a creative way to introduce kids to a bird like the flamingo.
6. Easy Bird Craft With Nest And Eggs

Image Source/Tutorial: Planning Playtime
I can’t get over how precious this craft is. First, cut a circle from some designed pink crepe paper or origami paper. Paste two 3D eyes on the folded circle, and add a small orange triangle for the beak.
To make the nest, you can use thin, thread-like pieces cut from brown, skin, and purple or blue paper. The base for the nest is made by arranging popsicle sticks.
It’s a really creative way to show how birds lay eggs and gives a sweet little display of bird life. Plus, it’s a great way to use different kinds of paper!
7. Beautiful Peacock Craft Using Popsicle Sticks

This peacock is just stunning! You’ll need to draw, paint, and cut out the peacock’s face and body using green or turquoise color. Then, use a pencil to sketch the feather design on each popsicle stick.
Arrange and paste the popsicle feathers so they look stretched out like a dancing peacock. A close look at the image will help you get it just right! Finally, use a black sketch pen or paint for the eyes.
What a gorgeous project, and a fun way to learn that the beautiful peacock that dances in the rain is the male bird!
8. Mini Popsicle Stick Chicks Craft Idea

Image Source/Tutorial: Crafty Morning
These little chicks are so cheerful! Just paint your popsicle sticks yellow and glue them together. Use orange origami paper to cut out the nose and feet. Then, stick on the 3D eyes, some small yellow wings, and a few strands for hair.
The best part is you can make a whole family of them just by changing the size of the 3D eyes or making other little tweaks. It’s a great activity for helping children recognize the structure of a chick and for practicing color identification.
9. Parrot Head Craft Using Popsicles & Feathers

Image Source/Tutorial: Gluedtomycraftsblog
This parrot head is such a clever idea! You’ll need some red and green feathers for this one. Take three popsicle sticks and glue them into a triangle.
Paste this triangle onto a red sheet of paper, or you can use a white sheet and color it red. Stick on a 3D eye and a black beak. The final step is to paste the feathers on to complete the look.
It’s a great way to talk about how parrots come in different colors; some have red heads and green bodies, or just red on their cheeks, depending on the species.
10. Very Simple Popsicle Stick Bird Craft

Image Source/Tutorial: Raj Easy Crafts
Talk about a quick and easy project! The basic idea is all right there in the image. Use one popsicle stick for the body and paste two eyes on it.
You can cut a beak shape from another popsicle stick and glue it in place. Then, just arrange more popsicle sticks to form the wings and tail. And you’re done!
It’s such a unique idea and a fantastic use for those popsicle ice cream spoons you might have saved up.
11. Funky Redbirds Craft Using Red Feather

Image Source/Tutorial: The Resourceful Mama
My kids would go wild for this one. First, paint the popsicle sticks with red color and paste them together. Cut and paste a black portion for the face, add the 3D eyes, and a kite-shaped beak that you fold in half.
Arrange the red feathers and glue them on to finish it off. I think it’s so cool that this craft can lead to a fun fact: a redbird is also called a Northern Cardinal.
It also kind of reminds me of Angry Birds, which is sure to be a hit with the kids!
12. How To Make Bird Using Craft Stick

Image Source/Tutorial: Triple-A Craft
This one is a bit more of a challenge, definitely for older kids over 12 or for a family project. You start by drawing a reference structure of the bird on paper.
Then, you wet the popsicle sticks in water or a special smoothing serum to make them easier to fold. By arranging and folding these wet sticks, you create the 3D wooden body of the bird, along with the wings and tail.
It’s really important to glue everything properly. You’ll need to be careful with the cutter and the specialized cyanoacrylate adhesive glue. It’s an amazing technique and results in a really impressive 3D bird!
13. DIY Popsicle Stick Owl Craft For Kids

Image Source/Tutorial: Craftionary
Whooo wants to make an owl? For this cute bird, take seven popsicle sticks and color them blue. Glue them onto a paper base. Then arrange yellow feathers as shown in the picture.
The feet are made from two small heart shapes cut from a foam sheet, and you can use that same foam sheet to make a triangle for the nose.
It’s a fantastic way to learn about the creative uses of feathers and foam sheets, and you end up with such a sweet owl for yourself.
14. Easy Chick Craft Project Using Popsicle Sticks
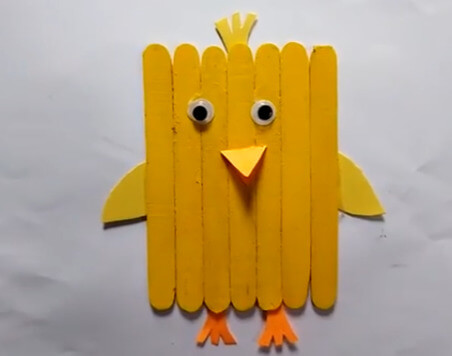
Image Source/Tutorial: JeeJee JoJo
Here’s another adorable chick craft! You’ll paint and paste yellow popsicle sticks as shown. Cut and paste some small yellow wings and a few hair strands.
The nose is a kite-shaped structure that you fold in half. Use an orange sheet to make the feet and glue them on.
This is a really great project for color and bird identification, and it builds those important observation skills in little ones.
15. Colorful Peacock Decoration Craft At Home

Image Source/Tutorial: Backyard Crafts
This dancing peacock is just so vibrant! A close look at the image makes it easy to follow. You’ll outline the face, add the beak, three crowning sticks, and a 3D eye.
Then, use colorful popsicle sticks to arrange and paste the beautiful tail of the dancing peacock. Don’t forget to add some pretty decorative stones to the top of each stick!
It’s a wonderful way to practice color understanding and recognition while making something new and exciting out of popsicle sticks.
16. Making a Popsicle Bird Craft Using Crepe Paper

Image Source/Tutorial: Reuse Grow Enjoy
I love how straightforward this one is. Just take five popsicle sticks, arrange them as you see in the picture, and glue them together.
Use crepe paper, an origami sheet, or even tissue paper to cut out the wings and nose for the bird, then paste them on. And of course, don’t forget to add the 3D eyes!
This is such a simple and new way to present a basic bird. It’s also great for practicing cutting skills, and you can get creative by changing up the colors of the wings and nose.